Get free updates of posts here
9 TIPS FOR DENTAL OPERATORY DESIGN
By Ideal Practices, the Experts in Opening New Dental Practices
In this article we’ll cover the 9 most important tips for you, as a dentist, to create the best dental operatory design of your career.
DENTAL OPERATORY DESIGN
Executives get corner office suites; dentists get custom treatment rooms.
In your operatory, it makes sense to invest time and effort in the best dental operatory design principles being used today. When your operatory is designed properly, you’ll have a clinical environment that can reach the highest levels of chairside comfort, income potential, and patient care.
Since you spend the majority of your day providing patient care in treatment rooms, it’s imperative to design yours the right way.
Each of these 9 Tips
You’ll learn that each of these dental operatory design principles are concepts that the Ideal Practices team uses to open highly successful, customized private practices for doctors all over the country.
Bonus Material:
When you read to the end, you’ll get access to a free copy of the 3-part Dental Operatory Design course at
www.idealpractices.com/floorplans
Whether you have an established practice in need of renovation, need to expand, or are starting with in a brand new space this article will help you: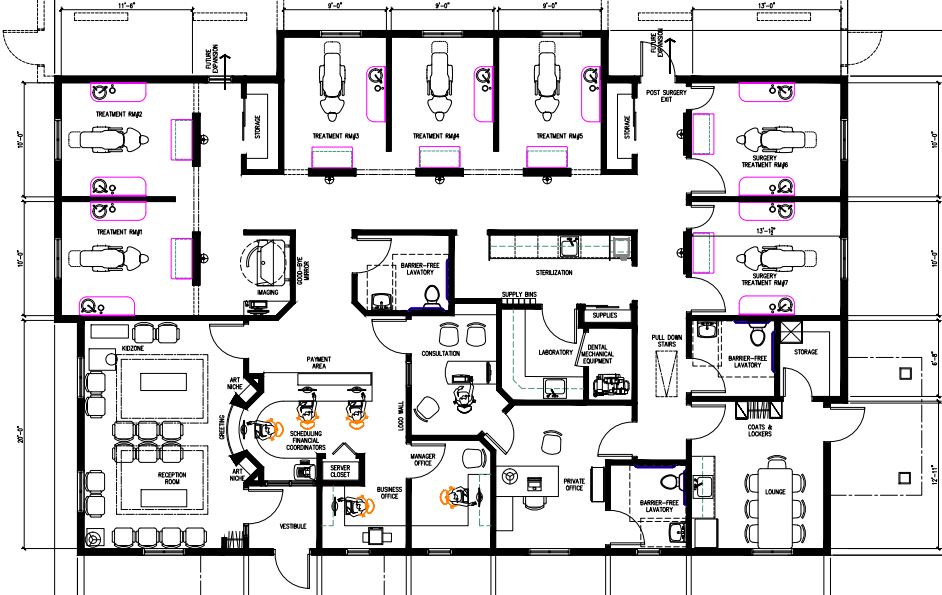
- Create the best clinical environment
- Get the control in practice ownership you deserve
- Learn how to have more profits, in the same space
- Design a space for the highest-quality patient care
Dental Operatory Design Tip # 1 ;
Strategy for Future Needs
When designing treatment rooms, it’s important to consider not only your current needs, but also any future needs. For instance, if adding CAD/CAM, cone-beam or 3D printing technology is part of your vision for the future, it’s important to communicate this as part of the initial planning process.
Knowing this information early in the discussion ensures the necessary considerations aren’t missed. Requirements related to things such as storage, clearances, electrical lines, data lines, air lines and plumbing will all be affected at this stage. Aligning this with your future plans must be included during the dental operatory design phase to prevent excessive retro-fitting costs and down-time in the future.
Dental Operatory Design Tip # 2:
Proper Dimensions
Of all the factors to consider, one of the first is size.
Ensure you have enough space to accommodate the necessary dental equipment while also allowing ample space to move about and work comfortably.
With today’s dental equipment and required ergonomics, ideally the treatment rooms should measure:
– 11 feet 6 inches in length and
– 9 feet in width with a
– 9 foot ceiling height
Treatment rooms designed with dual entry are the most efficient as they allow easy passage of both patients and clinicians in and out of the room.
If space is limited and dual entry design is not an option then the length of the treatment room should be extended from 11 feet 6 inches to 12 feet. The additional 6 inches provides the clearance needed for the dental assistant to walk around the patient at the toe end of the chair.
The width of the room is important as well. It should be a minimum of 9 feet wide to allow for proper ADA (Americans with Disabilities Act) access.
In a properly designed clinical zone, all treatment rooms should be identical in size and room layout. Working in standardized rooms is the most efficient model for today’s efficient dentists. It allows for delivery of patient care in any treatment room, minimizing costly room turnover costs incurred when moving the patient from room to room.
Dental Operatory Design Tip # 3:
Cabinetry Placement
Cabinet placement in the treatment room is also a factor in determining the overall width of the room.
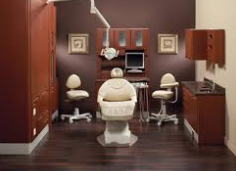 The current trend for doctors includes a cabinet at the twelve o’clock position and a support cabinet on the assistant’s side. With the integration of Electronic Health Records and centrally located sterilization centers, the need for cabinetry on the doctor’s side of the room is minimal. However, some doctors prefer to locate a sink for handwashing on his or her side of the room so patients can observe handwashing procedures prior to the initiation of treatment.
Cabinetry on the assistant’s side of the room provides adequate storage needs for room turnover and any supplies which may be needed during the procedure. If your preference includes support cabinets on both sides of the treatment room, then consideration should be given to expanding the width of the room to a minimum of 10 feet.
However, keep in mind expanding the width of the room takes valuable square footage away from another area of the design.
Dental Operatory Design Tip # 4:
The Hidden “5th Wall”
What about the ceiling?
Consider the ceiling a fifth wall and decorative element for patients to look at while in the supine position. The ideal height of the ceiling should be 9 feet high in an 11’-6”x 9’-0” room.
To put this in perspective, the average American home has a ceiling height of only 8 feet. It’s a surprise to most doctors how much of an improved experience is created in a modern practice with just a single foot of ceiling height difference.
This elevated ceiling height provides a sense of openness and supports a warm and welcoming feeling in the treatment room. When considering placement of the general lighting fixtures, it’s best to align ceiling fixtures over the patient’s head, not necessarily directly in the middle of the room.
Dental Operatory Design Tip # 5
Avoid These Cost-Savers
While cost is always a consideration, there are some things that you should not skimp on.
- Lighting in the treatment rooms is extremely important. Not having enough light may lead to eye fatigue and strain.
- Avoid laminated flooring as it tends to be noisy. Instead, consider quieter options such as glued down vinyl plank flooring.
- Ceramic tile with large grout lines should also be avoided as the doctor and assistant stools may get caught in the grooves.
Dental Operatory Design Tip # 6
The Open-Concept Floorplan
Do you prefer an open treatment room concept with central cabinetry separating the dental chairs instead?
Or do you prefer individual closed rooms?
There are pros and cons to each option.
Open concept design will work best in accommodating both right and left handed clinicians in the same room. With the open room concept, there could be a slight increase in the transmission of sound and resulting privacy concerns.
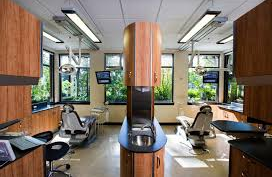
These concerns can easily be addressed by constructing a soffit above the central cabinet which divides the space between the chairs.
The soffit extends from the top of the central cabinet to the ceiling, significantly reducing the level of sound that travels between the spaces. Central cabinets are available in a variety of lengths.
Choosing the appropriate length for your space will ensure privacy between the chairs so patients do not have visibility to patients in adjacent chairs.
Dental Operatory Design Tip # 7
Central Cabinetry (with Tax benefits?)
Incorporating central cabinetry into the treatment room design may reduce construction costs slightly as the center cabinet eliminates the need for the construction of walls between the treatment areas.
Also, sinks positioned on the end of the center cabinet and pass- through x-ray units are shared between rooms, reducing the plumbing and electrical requirements and associated costs. Another benefit of using center cabinetry is the ability to move or relocate the cabinetry should you decide to move to a new facility.
The use of central, free standing cabinetry may provide tax benefits through depreciation value. Always consult with a tax professional relative to your individual situation.
Overlooked considerations about Central Cabinetry:
1. If a shared x-ray unit is out of service you lose the ability to take radiographs in not one but two treatment rooms.
2. Special attention should be paid to addressing any privacy concerns.
3. Most x-ray units are designed to be used in one room. Using a pass-through system may require additional adjustments to patient and chair position when exposing radiographs to ensure proper alignment.
Dental Operatory Design Tip # 8
Dual Monitors
With the integration of digital dentistry and Electronic Health Records, two computer monitors are standard in every treatment room.
Done correctly, one of the monitors is stationed at the twelve o’clock cabinet, behind the patient and in full view of the doctor or dental assistant. This monitor is the “heartbeat” of the practice. It is where you access and view your practice management functions like appointment scheduling, treatment planning and entering completed treatment and clinical notes.
The second monitor is used to share information with the patient and engage them in the 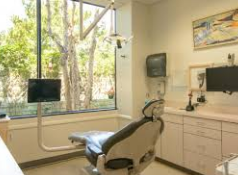 co-diagnosis process. This monitor should be positioned for easy viewing by the patient and the clinician. Consider mounting the second monitor on the wall in front of the patient or on the ceiling.
Dental Operatory Design Tip # 9
The “Bonus” Design Area
Finally, think about the appearance of the wall behind the 12 o’clock cabinetry.
This wall, viewed from the hallway, is an often overlooked bonus design area that can create a valuable visual enhancement for patients as they enter the treatment area.
Design this wall to be warm and inviting in appearance by adding architectural millwork, a painting, a print or decorative wall sconce.
>>Low-Cost, High-End Tip:
Often, our designs will add a low-cost luxury design touch by creating a shallow recessed cavity in that wall behind the 12 o’clock cabinetry. We’ll often do this by adding a small LED light positioned to attract the eye to an artistic element positioned within the cavity.
Your “Corner Office”
Remember, your treatment room is akin to an executive’s corner office suite.
The best moments of your career will take place in those operatories.
That’s why we hope these 9 dental operatory design tips will guide you well.
Investing the time and effort in planning your next treatment rooms! You’ll ensure efficiency and comfort for you, your staff and your patients for many years to come.
Bonus Material
Readers are offered free access to the 3-part Dental Operatory Design course from Ideal Practices.
Get your copy of the Dental Operatory Design course here:
www.idealpractices.com/floorplans
Best of luck to you as you explore opening a new office!

Co-Authors:
Michelle Kratt is the Ideal Practices Startup Practice Advisor. With over 25 years of experience working in dental offices, speaking, writing and consulting, Michelle teaches our High Level Consulting Clients through the 10 Step Dental MBA, prior to opening a new practice. She is a Fellow of the American Association of Dental Office Management (AADOM) and the Association of Dental Implant Auxiliaries (ADIA).
John Malone is the Ideal Practices Lead Floorplan Designer. With over 30 year of award winning design and extensive practice management knowledge he creates floorplans for the Ideal Practices High Level Consulting Clients for dynamic improvement in the efficiency of a new practice. With over 4,000 offices designed, the experience and skill is what you need to achieve your customized vision.

 Check out our reviews at Amazon!